")
Wishlist
- Add to Wishlist Button Placement
- Adding the Wishlist Plus Launch Point to your Shopify Site's Header Menu
- Customize the Location of the Floating Wishlist Button
- Customize the Text and Position of the Wishlist Notification Popup - API
- Customizing the Add to Wishlist button for My Store
- How to enable multi-language support for Wishlist Plus
- Wishlist Customization Inspirations
- Wishlist Plus customizations cheatsheet for Shopify stores
- Validating the Required Files after a Theme Update on Shopify
- Adding the Wishlist Button to Your Collections Page
- How to Add a Trending Wishlist Items Widget
- How to Render a Custom Wishlist on an Existing Page
- How to Enable a Custom Wishlist Modal
- How to Enable Add to Wishlist Buttons in QuickView
- How to Enable the Multiple List Feature
- Custom Wishlist Button
- Requiring shoppers to login before they can add to wishlist
- How to personalize Customer Accounts page to boost retention
- Setting Up Wishlist Notifications via SMS
- Setting Up Klaviyo to Send SMS Flows
- Show all articles ( 5 ) Collapse Articles
- Cordial Integration
- Dotdigital Integration
- Facebook Pixel Integration
- HubSpot Integration
- Listrak Integration
- Mailchimp Integration
- ReSci Integration
- Sailthru Integration
- Shopify Flow Integration
- Optimizely Integration
- Bloomreach/Exponea Integration
- What are events or triggers in Swym integrations
- Yotpo Integration
- Articles coming soon
Back in Stock Alerts
- Back in Stock Notification
- Back in Stock Reminder Emails
- How To Change the Swym Back in Stock Alerts UI
- How To Create a Custom Out of Stock Button
- How to Disable Back in Stock Alerts on an Individual Product
- Localizing the Back in Stock Alerts Feature
- Back in Stock Button Placement
- Validating the Required Files after a Theme Update on Shopify
- Implementing a custom Back In Stock Alerts button
- How to send alerts in batches
- How to Enable Pre-Order Alerts
- How to Add a Recently Back in Stock Widget
- Multi-location Support in Shopify
- Advanced Inventory Controls: How to prevent or disable alert signups on specific products
- Enabling Back in Stock Alert Buttons on Collections Pages
- How to set up Swym back in stock subscription confirmation emails
- Advanced Inventory Controls: Setting up Minimum Thresholds
- How to add and use the Swym Back in Stock Alerts extension with Shopify POS
- How to add product recommendations to out-of-stock product pages with Swym Back in Stock Alerts
- How to publish Swym Back in Stock Alerts from development theme to live theme
- How to enable multi-language support for Swym Back in Stock Alerts
- Show all articles ( 6 ) Collapse Articles
- Facebook Pixel Integration
- HubSpot Integration
- Shopify Flow Integration
- Optimizely Integration
- ReSci Integration
- Sailthru Integration
- Listrak Integration
- Dotdigital Integration
- Cordial Integration
- Mailchimp Integration
- Postscript Integration
- Bloomreach/Exponea Integration
- What are events or triggers in Swym integrations
- Yotpo Integration
- Back in Stock Alerts and the Metrics They Drive
- Back in Stock Alerts Customization Inspiration
- Back In Stock Alerts Lookbook
- Back in Stock email alert triggers: Single batch or multiple batches?
- How to Create an Omnichannel Customer Experience with the Swym Back in Stock Alerts App
- How to Use Integrations to Do More With Swym Back in Stock Alerts
- Seasonal Marketing Best Practices to Help Your Brand Thrive
- How to Create an Omnichannel Customer Experience with the Swym Back in Stock Alerts App
- How and Why to Enable Marketing List Opt-Ins
- How to Choose Between Modal and Inline Forms
- Best Practices for Back-In-Stock Email Design—Getting the Most Out Of Your Alerts
- Best Practices to Optimize the ‘Notify Me’ Button
- How to Optimize Out-Of-Stock Product Pages to Drive Traffic and Conversions
- Why you need to add AI-powered recommended products on your out-of-stock product pages
- Emails Not Sent - Troubleshooting
- How to test the Klaviyo SMS and Email integration with your Swym Back in Stock Alerts App
- Why am I not seeing subscriptions?
- Why Are My Out-Of-Stock Products Not Visible?
- Why is the ‘Notify Me When Available’ Form or Button Not Showing Up On My Out of Stock Product Pages?
- How to Add a Recently Back in Stock Widget
- Multi-location Support in Shopify
- How to Manually Send Back in Stock Alerts
- How to set up Swym back in stock subscription confirmation emails
- How to Access and Read Reports for Your Swym Back in Stock Alerts
- How to Create an Omnichannel Customer Experience with the Swym Back in Stock Alerts App
- How to Use Integrations to Do More With Swym Back in Stock Alerts
- Seasonal Marketing Best Practices to Help Your Brand Thrive
- How to Create an Omnichannel Customer Experience with the Swym Back in Stock Alerts App
- How to disable the Swym Back in Stock Alerts App
- How and Why to Enable Marketing List Opt-Ins
- How to Choose Between Modal and Inline Forms
- Best Practices for Back-In-Stock Email Design—Getting the Most Out Of Your Alerts
- Why am I not seeing subscriptions?
- Best Practices to Optimize the ‘Notify Me’ Button
- Why Are My Out-Of-Stock Products Not Visible?
- Why is the ‘Notify Me When Available’ Form or Button Not Showing Up On My Out of Stock Product Pages?
- How to Optimize Out-Of-Stock Product Pages to Drive Traffic and Conversions
- How to add product recommendations to out-of-stock product pages with Swym Back in Stock Alerts
- How to publish Swym Back in Stock Alerts from development theme to live theme
- How to enable multi-language support for Swym Back in Stock Alerts
- Show all articles ( 6 ) Collapse Articles
Partner Integrations
- Cordial Integration
- Dotdigital Integration
- HubSpot Integration
- Listrak Integration
- Mailchimp Integration
- ReSci Integration
- Sailthru Integration
- Shopify Flow Integration
- Shopify POS Integration
- Optimizely Integration
- How to integrate your Shopify store with Facebook Pixel?
- Ometria Integration
- Postscript Integration
- Bloomreach/Exponea Integration
- What are events or triggers in Swym integrations
- Yotpo Integration
- Connect Swym Apps with Iterable
- Enabling OAuth for Klaviyo
- Attentive-Swym Integration
- Show all articles ( 4 ) Collapse Articles
Developer Docs
- Customising Wishlist for personalised products
- Five showcase implementations that leverage the Swym JS APIs
- How to move items from shopping cart to wishlist instead of abandoning them
- Overriding Lightweight UI / Product Details Popup
- Overriding Swym Notification
- Publishing your Top Wishlisted products using the Swym Javascript API
- Showing wish-listed products on cart page
Gift Registry
- How To Configure the Swym 'Add to Registry' Button
- How to add the “Add to Registry” button to Vintage themes
- How to customize your gift registry
- App Installation
- Pages to setup for a successful Gift Registry Implementation
- How to archive a gift registry
- How to add Gift Registry to your store's Main menu
- How to hide a gift registrant’s shipping address from gifters during checkout
- Get Started with Swym Gift Lists and Registries
- Swym Gift Lists and Registries for Shopify POS
- Swym Gift Lists and Registries App Offboarding Instructions
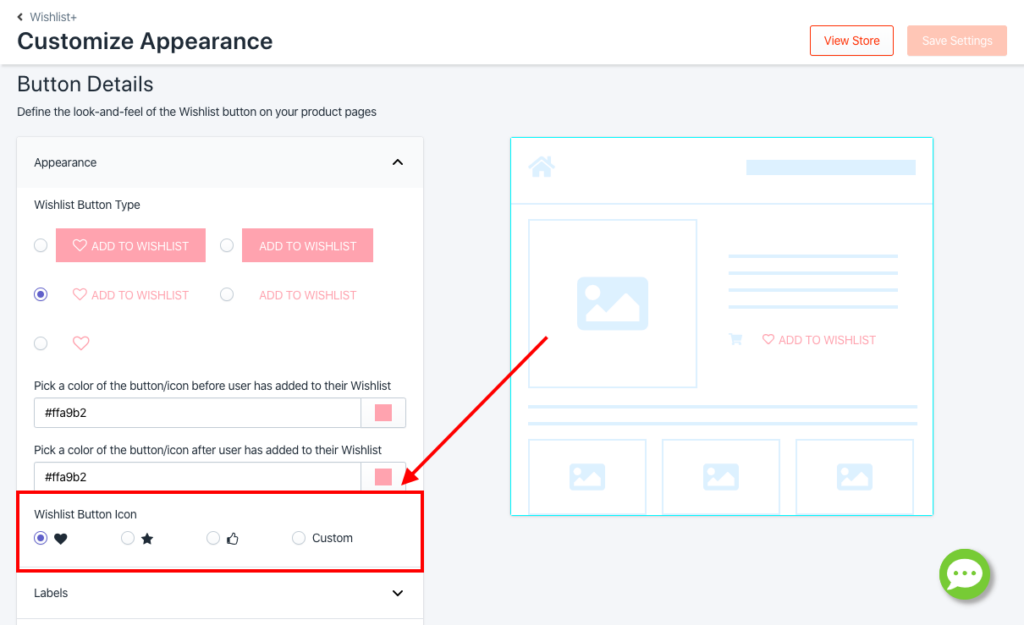
Customizing the Add to Wishlist button for My Store
How do I customize the Add to Wishlist button for my store?
The app allows you to customize the Add to Wishlist button for your Wishlist module to an Icon of your choice. You can either choose from one of the predefined wishlist buttons i.e.,a heart, star or a thumbs-up icon, or add a custom button of your choice. You can upload a custom icon in png or gif format (40×40 pixels) if you are looking to enable a custom launch button for your Wishlist.
To customize the wishlist button of your Wishlist module:
- Log in to your Swym Dashboard > Navigate to Wishlist Plus > Customize Wishlist Appearance.
- Go to the Button Details section > Wishlist Button Icon(refer to the image below)
How do I customize the Wishlist Nudge on my store?
The app allows you to customize the pop-up that is shown to the shopper prompting them to add the product to Wishlist when they view the product for more than 15 seconds. The app allows you to edit the labels and color of the button that is shown on the pop-up.
To customize the Wishlist Nudge of your Wishlist module:
- Log in to your Swym Dashboard > Navigate to Wishlist Plus > Customize Wishlist Appearance.
- Go to the Button Details section > Wishlist Nudge

Make sure to save your settings after making any changes by clicking on the Save button in the top right corner. Clear your browser cache and cookies, or check in a fresh incognito session to make sure the changes that you made are reflected on your live site.