")
Custom Wishlist Button
This is an advanced feature that requires knowledge of your eCommerce platform theme editor and languages, such as HTML, CSS, Javascript and Liquid templating as required.
This tutorial will help you set up a custom wishlist button on an ecommerce store.
Shopify – Liquid based themes (from the Shopify theme store)
There are just two steps to include the custom wishlist button to the product page
Step 1 – Enable custom button
Visit Swym admin page -> Wishlist Plus (In left side bar, under “Configure”) -> Customize Wishlist Appearance (click “Configure”) -> Scroll down to “Button Details” -> Check “Enable Custom Button” under “Appearance” -> “Save settings” on top right of the page
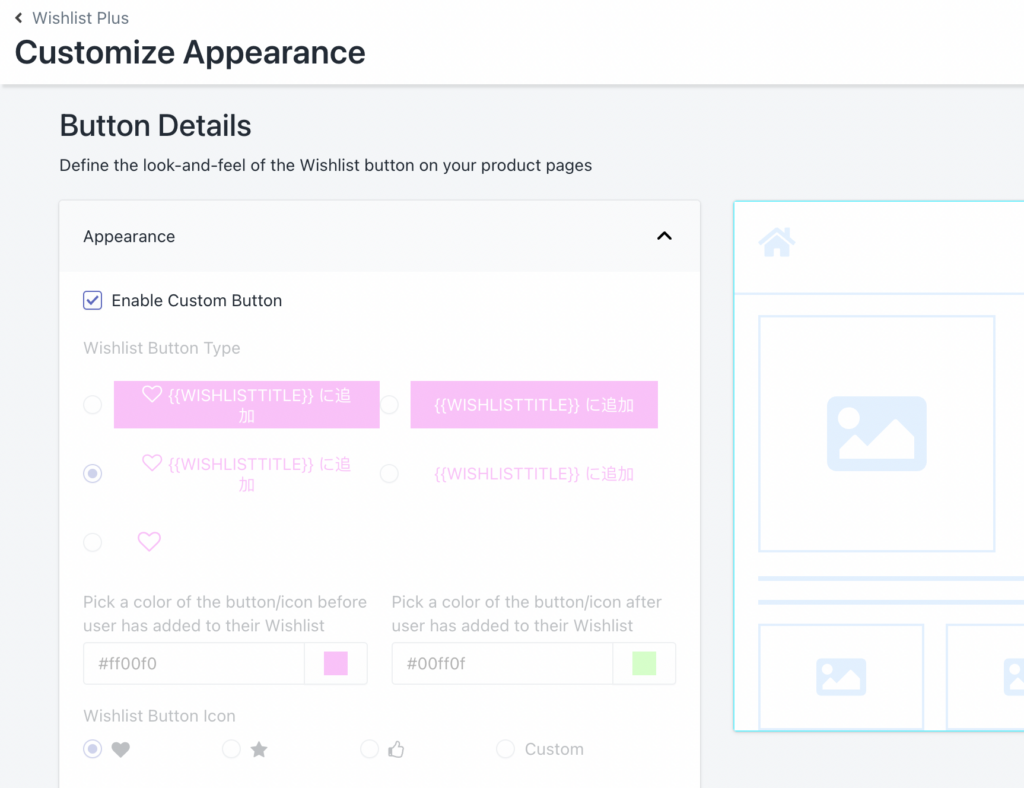
Enabling it will stop rendering Swym’s default wishlist button.
Visit your store by clicking “Click here to view your store” in the toast that shows up after successful save. You won’t be seeing Swym’s default wishlist button anymore.
You can wire your own button instead by following the steps given below.
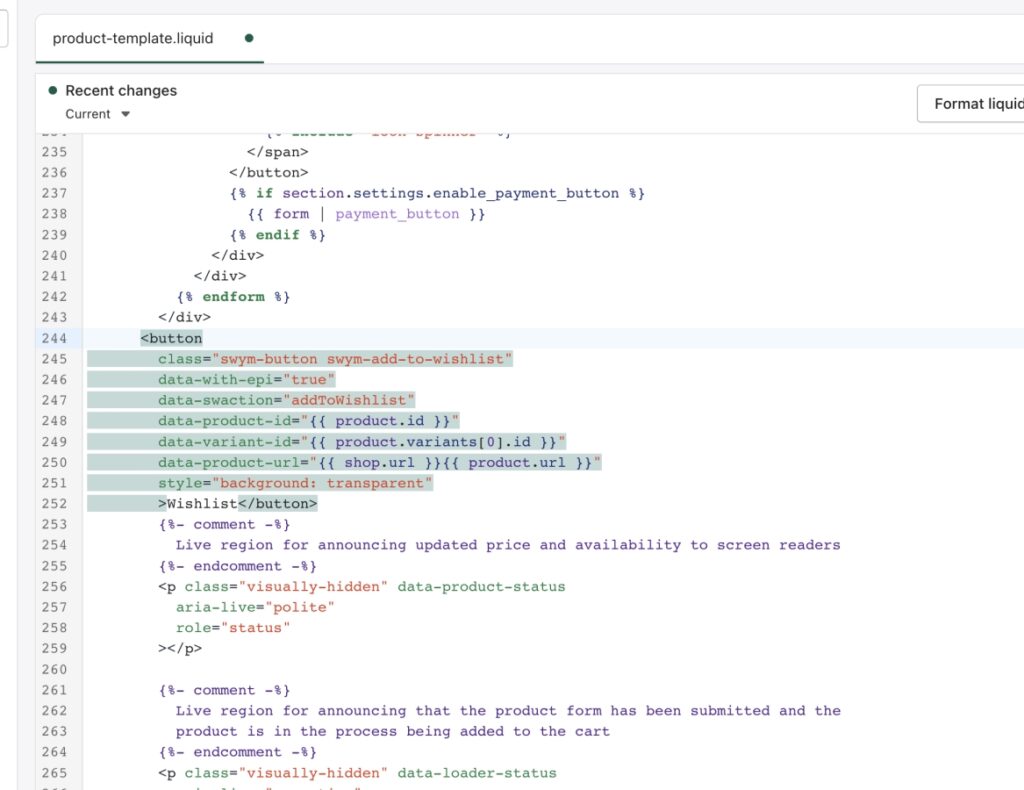
Step 2 – Wire your own button as a wishlist button
Add following attributes to your custom button:
class="swym-button swym-add-to-wishlist"
data-with-epi="true"
data-swaction="addToWishlist"
data-product-id="{{ product.id }}"
data-variant-id="{{ product.variants[0].id }}"
data-product-url="{{ shop.url }}{{ product.url }}"
e.g.
Explanation:
- Class: Swym’s classes to detect the button and apply logic
- With epi: A flag for Swym’s internal logic
- Swaction: Swym action
- Product ID: ID of the product on the page
- Variant ID: Variant ID of the product on the page (we are choosing 1st variant by default)
- Product URL: A query param free URL of the product on the page
Replace {{ product.id }}’s “product” keyword with any other keyword if your store has modified it.Save your file and refresh your product page to see if your custom button is functional now. To do that, simply click on it and it will try to add your product to the wishlist.
Please note that this takes care of variant change logic as well. So your button should automatically be initialized upon variant change detected by Swym on the product page.
Also, make sure you have applied proper styling of ‘added’ vs ‘non-added’ looks of your button. You can rely on the swym-added class on your button to determine if the button is in a wishlisted state or not.
Scenario 1: You have your custom heart icon which can be modified with css
In that case, you can use css like the following to control your ‘added’ vs ‘non-added’ behavior.
Let’s consider that by default your icon (for example, an HTML element with “my-icon” as a class name) has pink color and after adding, you’d like to change it to red, then:
.my-icon.swym-added {
	 Background: red;
}
E.g. Check this sample wishlisted button, this button will get red background upon wishlisted because of css shown above:
<button class="my-icon swym-button swym-add-to-wishlist swym-iconbtnlink swym-heart swym-added swym-loaded" data-with-epi="true" data-swaction="addToWishlist" data-product-id="607548778103" data-variant-id="3750408241168" data-product-url="https://my-dev-store.myshopify.com/products/14k-dangling-obsidian-earrings">
<img src="https://nrercorp.com/wp-content/uploads/2016/10/Wishlist-Icon.png" style="height: 40px; width: 40px;">
</button>
Scenario 2: You have 2 different icons, one for unfilled and one for filled
In that case, you can choose to toggle the visibility of one of the other icon or completely add or remove the other icon upon wishlist actions.
Let’s consider that by default you show ‘unfilled’ icon on page load as you are visiting the product for the first time. Then you would like to hide the other ‘filled’ icon and only show it when user wishlists an item. Consider that “my-icon-unfilled” is your class for empty wishlist button and “my-icon-filled” is your class for wishlisted button. We can achieve it with css as shown below:
.my-icon-unfilled.swym-added {
	display: none;
}
.my-icon-filled:not(.swym-added) {
	display: none;
}
E.g. Following button will have display “none” if “swym-added” is found.
<button class="my-icon-unfilled swym-button swym-add-to-wishlist swym-iconbtnlink swym-heart swym-added swym-loaded" data-with-epi="true" data-swaction="addToWishlist" data-product-id="607548778103" data-variant-id="3750408241168" data-product-url="https://my-dev-store.myshopify.com/products/14k-dangling-obsidian-earrings">
<img src="https://nrercorp.com/wp-content/uploads/2016/10/Wishlist-Icon.png" style="height: 40px; width: 40px;">
</button>
Following button will be visible since “swym-added” is available
<button class="my-icon-filled swym-button swym-add-to-wishlist swym-iconbtnlink swym-heart swym-added swym-loaded" data-with-epi="true" data-swaction="addToWishlist" data-product-id="607548778103" data-variant-id="3750408241168" data-product-url="https://my-dev-store.myshopify.com/products/14k-dangling-obsidian-earrings">
<img src="https://nrercorp.com/wp-content/uploads/2016/10/Wishlist-Icon.png" style="height: 40px; width: 40px;">
</button>
Scenario 3: simply use javascript to add/remove the non-desired button.
Let’s say we would like to remove “unfilled” button upon successful wishlist, then do the following (consider filled and unfilled button are there as shown in scenario 2 above):
var unfilledButton = document.querySelector(".my-icon-unfilled");
if (unfilledButton.parentNode) {
  unfilledButton.parentNode.removeChild(unfilledButton);
}
And then insert the filled icon:
elem.insertAdjacentElement('afterbegin', filledIconElement);Do the reverse if you would like to again show an unfilled icon upon ‘remove from wishlist’.
Still not working?
- To avoid disruption to your users: Use our default button by choosing it from Swym Admin or disable the Swym Wishlist app entirely using the Swym Admin.
- Next, please create a support ticket via Swym Admin with any helpful info and we’ll follow up to get you setup.